Since the release of Samsung Galaxy devices, many people are familiar with taking screenshots on these devices. The process of taking a screenshot on a Samsung Galaxy device is simple, but there are a few things to keep in mind. This article will outline the process of taking a screenshot on a Samsung Galaxy device, and include specific instructions for taking screenshots on a Samsung Galaxy Note 9.
How to Take a Screenshot on a Samsung laptop
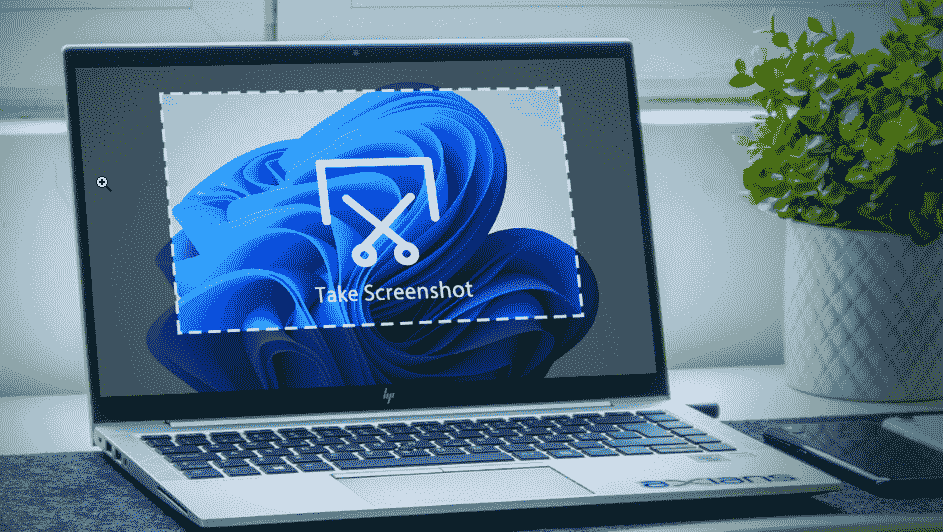
There are a few different ways to take a screenshot on a Samsung laptop.
The most common way to take a screenshot on a Samsung laptop is to press the “Screenshot” button on the keyboard. This will save the screenshot on the laptop’s hard drive.
Another way to take a screenshot on a Samsung laptop is to use the “Windows 10” button on the keyboard. This will open the “Windows 10” interface. In the “Windows 10” interface, you will see a “Pictures” section. Under the “Pictures” section, you will see a “Screenshots” section. In the “Screenshots” section, you will see a “Screenshot” button. You can press the “Screenshot” button to save the screenshot on the laptop’s hard drive.
The last way to take a screenshot on a Samsung laptop is to use the “Windows 10” button on the keyboard, and then press the “Print Screen” button. This will save the screenshot on the laptop’s hard drive as a “Print Screen” file.
The Different Ways to Screenshot on a Samsung Laptop
There are quite a few ways to screenshot on a Samsung laptop, depending on what software you are using.
1. To screenshot using the built-in screenshot software on a Samsung laptop, open the application, select the area you want to capture, and press the Screenshot button.
2. If you are using a third-party screenshot application, you will need to open that application, select the area you want to capture, and press the Screenshot button.
3. You can also capture screenshots by pressing the key combination Ctrl+Shift+3 (or CMD+SHIFT+3 on a Mac).
4. You can also capture screenshots of entire websites by opening the web browser and visiting the website you want to capture. In the web browser, go to the address bar, and type in the website’s address. Then, press the Enter key. The website will open in a new tab, and you can press the Screenshot button to capture the entire website.
How to Save a Screenshot on a Samsung Laptop
There are a few ways to save a screenshot on a Samsung laptop. The easiest way is to use the Samsung Screenshot app which is included on most Samsung laptops. To use the Screenshot app, open the app, press the Alt + Print Screen button, and then paste the screenshot into a text or image file.
Another way to save a screenshot on a Samsung laptop is to use the “Windows key + Prt Scr” key combination to take a screenshot. This method works on most PC and Mac computers.
If you don’t have the Screenshot app or the Windows key + Prt Scr key combination, you can also take a screenshot using the Samsung Galaxy Smart Remote. First, press and hold the “Windows key” and the “S” button on the Samsung Galaxy Smart Remote. Then, press the “Print Screen” button on the Samsung Galaxy Smart Remote. The screenshot will be saved to the “Pictures” folder on the Samsung Galaxy Smart Remote.
Also Check:- Save Tiktok Without Logo
How to Edit a Screenshot on a Samsung Laptop
There are a few different ways to screenshot on a Samsung laptop, depending on the software you are using.
If you are using a Windows computer, you can use the Snipping Tool to take a screenshot. To do this, open the Snipping Tool by clicking the Windows logo on the taskbar and selecting it. Once open, select the area you want to capture and hit the Snip button.
If you are using a Mac, you can use the Preview app to take a screenshot. To do this, open the Preview app and click on the Screenshot button at the top of the window. Next, select the area you want to capture and hit the Take Picture button.
If you are using a Linux computer, you can use the greenshot program to take a screenshot. To do this, open the greenshot program and select the area you want to capture. Next, select the type of screenshot you want to take and hit the Take Picture button.
The Benefits of Taking Screenshots on a Samsung Laptop
There are many benefits to taking screenshots on a Samsung laptop, including the ability to capture important information or screen captures during a gameplay session, in order to prove to others that you were the user responsible for a certain event. Additionally, if you are ever unfortunate enough to experience a problem with your device, taking a screenshot can be a valuable resource in resolving the issue. Finally, if you are a business owner or individual who relies on electronic documentation to support your claims, taking screenshots can be an essential tool in documenting your work.
There are a few different ways to take a screenshot on a Samsung laptop, depending on the device and software you are using. The most common method is to press the “F11” key and select “Screen Capture” from the options that appear. This will open a window that will allow you to capture the entire screen or a specific section of it. Additionally, some laptops also include a “Screenshots” folder on the desktop, which you can use to save any screenshots you take.
Regardless of how you take a screenshot, it is important to be mindful of your device’s battery life. The more images or videos you take, the more battery life your device will need to maintain those files. Additionally, be aware of how long it will take to save a screenshot, as well as the device’s storage capacity. If you plan on taking a lot of screenshots, it may be best to purchase
Conclusion
While there are a few different ways to screenshot on a Samsung laptop, the most common way is to use the keyboard shortcut, “F5.” To do this, press the “F5” key on your keyboard to take a screenshot, and then press the “PrtSc” (Print Screen) key to save the screenshot to your computer.

